Columbus, Texas
Copyright 2009 Jeff Lynch Photography
Shot taken with a Canon EOS 40D set on aperture priority (Av) using an EF-S 10-22mm f/3.5-4.5 USM tripod-mounted. The exposure was taken at 18mm, f/13 for 1/40th of a second at ISO 100 on Sandisk digital film. Post capture processing was done in Lightroom 2 and Photoshop CS4 using ePaperPress’ PTLens and Nik Software’s Silver Efex Pro plug-in filters. Click on the image above for a larger version.
If you enjoy travel, architecture or even urban photography, sooner or later you’ll run across a situation where you take a shot of a beautiful tall building but end up with an image you don’t like due to the complex distortions created by your very expensive wide-angle lens. You could use a very expensive tilt & shift lens like Canon’s new TS-E 24mm f/3.5 L II to correct the perspective distortion but what about the barrel or pincushion distortion? Luckily there is a great little tool called PTLens that can handle almost every type of complex distortion correction you’ll ever run into.

Raw Image from Camera
Let’s take this image for example. I took this shot of a turn of the century bank building in Columbus, Texas using my EOS 40D and ultra-wide angle 10-22mm lens. This lens is very sharp and provides excellent contrast for most shots, but it does exhibit some pincushion distortion at the far end and like most wide angle lenses, it tends to distort the perspective when tilted up at a subject like this bank building. Correcting the perspective and pincushion distortion exhibited by this image is actually fairly simple using the process outlined below.
My first step is to develop the entire image in Lightroom 2 BEFORE CROPPING. Although this goes against my normal workflow, it’s very important not to crop the image at this point in time.

Basic Develop Settings
I generally work on the other Basic settings like Exposure, Recovery (very important), Blacks (also very important), Brightness and overall Contrast. I almost always crank up the Clarity (adding mid-tone contrast) and Vibrance (adding mid-tone saturation) and may play with these two settings for 20 or 30 minutes until I find a combination I like.

Tone Curve Adjustments
Next I begin tweaking the Tone Curve controls until I obtain the contrast desired in the image. A good rule of thumb I always try to follow is to make sure you have some deep black areas and pure white areas when you’re done adjusting the Tone Curve.
Here’s a quick trick to add some contrast to your sky. Just lower the luminance of the color blue slightly to create a much more dramatic sky without it looking fake.

Luminance Adjustments
To enhance the colors and really set the “mood” of the image I’ll generally spend quite some time playing around with the Hue, Saturation and Luminance settings. This is where you let your creative side go wild trying different combinations for each color until you obtain just the right look and feel.

Saturation Adjustments
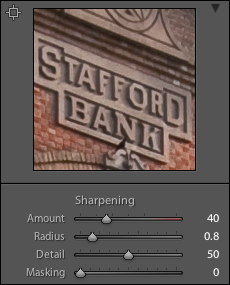
The next step is to add Sharpening and depending upon your image, the tools built into Lightroom may or may not be up to the job. In this case, the mid-tone contrast of the bricks in this image is sharp enough that I can use Lightroom to add just a bit more sharpness before exporting the image.

Sharpness Adjustments
At this point, my work in Lightroom is complete and my next step is to export the image in Photoshop CS4 and then run the PTLens plug-in filter. Click on the image below to see a larger version.

PTLens in Photoshop CS4
The PTLens plug-in reads the EXIF data from the image and automatically corrects the barrel and pincushion distortion caused by my specific lens. To see the effect of this, you can uncheck and recheck the Preview checkbox. To correct Perspective distortion you’ll need to show the Grid and then adjust the Vertical and Horizontal controls until the vertical lines in the image are truly vertical. You’ll need to play around with this for a while until you achieve the desired results.
The next step is to crop the image to remove the black areas cause by the perspective correction as shown here. As I said earlier in this post, it’s very important to crop your image AFTER using PTLens to correct the distortion.

Cropping in Lightroom
My next step is to add some darkening around the edges to highlight the center of the image. Lightroom’s Lens Correction and Post-Crop settings do a very good job of this without adding significant noise to the image. I really like how the Feather and Roundness controls allow very detailed control of the vignetting desired.

Post-Crop Adjustments
Finally a quick trip to Nik Software’s Silver Efex Pro to convert the image to black & white and we’re done.
Posted in Photography Tagged: Adobe Photoshop Lightroom, Canon, Canon 40D, Photography, PTLens
![]()